Brighton is a great place to play a Steamroller tournament, the community is great, the venue is great and the games are always fun! So, if anyone from Brighton is reading this, big shout out to you guys!

So, back to list dojo, after last week, i just conceded that I have to learn to play Rask, so out goes Arkadius, and in comes my Cygnar counter. Also, I felt my Maelok list was not quite optimised, there were still models in the list that were not "being relevant". Namely, the Witch Doc was 4pts that, really, only gave +1" movement on the first and second turn. Considering the first two turns consisting of running, I believe that extra 2" is negligible specially when the theme gives 2" deployment. Sacrificial Strike i've hardly used in the many games i've used him, and Ghostly is almost never used in this list in particular. Also, while i love the Ironback Spitter and Croak Raiders as a shooting module, I fancied the idea of swapping it out for Boneswarms so i can trade up for heavies. between three corpse markers and Rage animi, they're P+S18, no Knockdown, native Pathfinder and Swarm animi for a measly 7pts. The points saved from not taking the Witch Doc and dropping the Void Leeches also got me the Cauldron. Allows me to fuel up the Boneswarms and give the ever needed Puppet Master. There have been a few occasions where a boosted Mortality from Maelok or the Soul Slave has missed and that reroll would have been greatly needed!
Now to my SR sheet.

I took the event with 4 solid scenario wins. The match ups in general i thought were interesting and I had the opportunity to test Maelok into a lot of new situations. Unfortunately, my hate relationship with Rask continues, i'll eventually get round to playing him, but i'm just loving Maelok and his play style at the moment.
Game 1 - Maelok vs GAspy1 (Banes Banes and a Wraith Engine in Bane theme)
GAspy1 with his -5 ARM swing is one of those lists i've highlighted as red flag for Maelok. An abundance of hard hitting infantry with huge ARM swings similar to Sentinels.


The game plays out pretty much to plan. I brain-farted mid game and ran a Thrullg to the right for reasons i don't know, but that is what clock can do for you! I only score one on my turn as the Banes hiding behind the hazard survived and the second Thrullg being in the wrong position mean't i couldn't get the last damages to the Wraith Engine. Turn three plays out with pieces being traded, GAspy1 fails to get Parasite off as all the Gators targetable are in combat and Maelok goes 4-0 up with zone scoring and a destroyed Objective leaving a turn 4 of Maelok cleaning up for the last control points.
Game 2 - Maelok vs Mortenebra2 (Warjacks and Mechanithralls out of theme)
Second game and Cryx again. This time, a hybrid list of out of theme Mortenebra2, I assume to get Dire Seers with the Warjacks. I'm not 100% sure why but my opponent was a seasoned Cryx player so I wasn't going to question just yet!
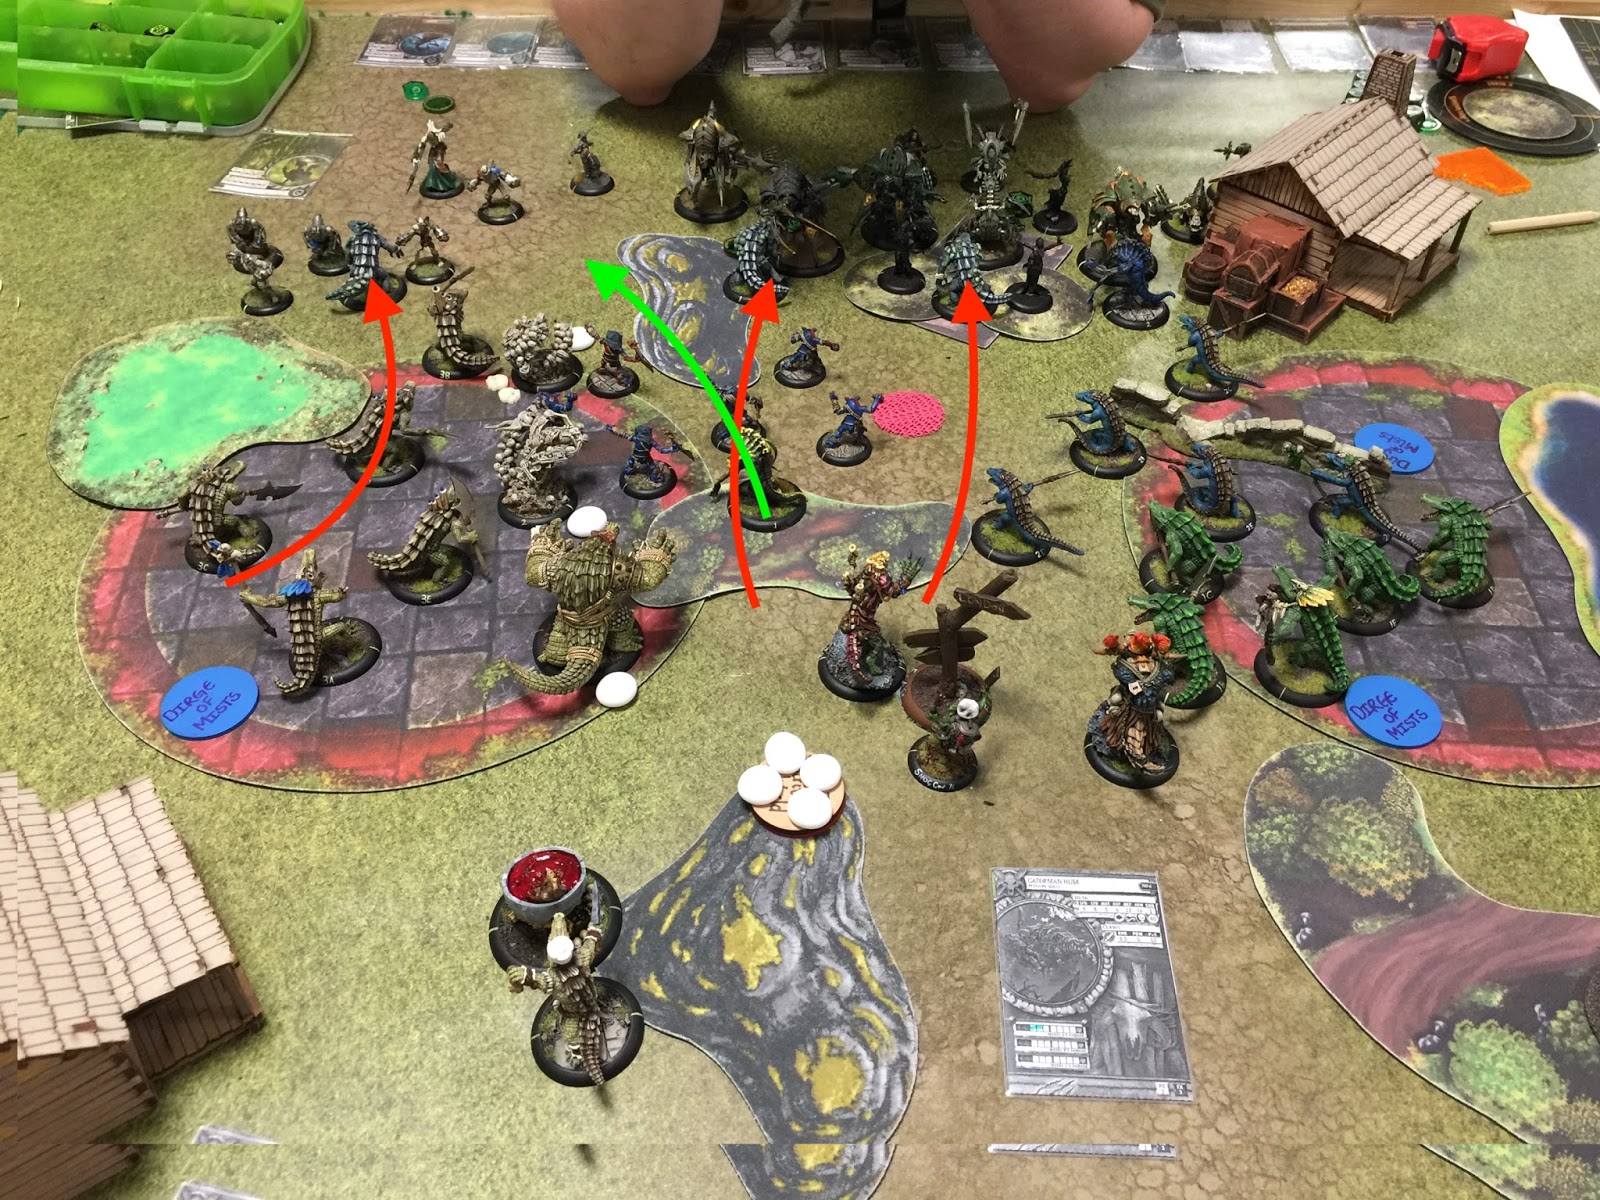
I managed to get first turn, and did the usual run everything forward for two turns. The picture to the left is the state of play on Cryx Turn Two. The red arrows show the running path of the Husks under feat. On the left, the Husk embedded itself as far into the Mechanithralls as possible to stop as many getting through to the zone. Down the middle, one Husk ran into a Warjack in a position where, if it died there and then, the resulting cloud effect would block off LoS to whats behind. The other Husk ran to engage the Dire Seers attempting to shield Mortenebra herself from the Croaks. This led to a conundrum of killing the Husks and wasting a Warjack activation to free the Dire Seers and hope the explosion doesn't kill them, or get stuck in that line and let the Gators claim more board control. The green arrow shows the area of focus for the Croak Raiders, killing off Mechanithralls that the Husk wouldn't catch when exploding and limiting what can get into the zone in retaliation.

This sort of game that shows you don't have to always kill the enemy to win and it's important to know where to set the battle line. I only scored 20 army points destroyed this game, and I think all of that was a Harrower and Warwitch that contested a zone. The red line in the picture shows where i intended to hold the fight and to contest, they would have to get through it.
End of Part 1
This is part of a series where i'm going to try and recap my thoughts and game plans in blog format so i can go back and re-evaluate where i could have been better. Meaning these posts can be a lot more detailed than normal. If you have any questions, or helpful tips, then please by all means let me know!
I'll be posting up the final two games later today.
Also, cheers for the photos from the people in the Brighton SR!
Well done mate!!
ReplyDelete